


Der Neopixel Ring ist ein wirklich cooles Produkt, dass sich für verschiedenste Projekte eignet. In diesem Tutorial erfährst du, wie du den Ring ansteuerst.
Sicher kennst du die in jedem Elektrofachhandel erhältlichen LED-Streifen oder -Ringe mit parallel geschalteten Leuchtdioden. Es gibt sie beispielsweise mit 60 LEDs an einem Streifen oder auch als Viertelring mit 15 LEDs, die du in Kombination mit weiteren Segmenten zu einem größeren Ring zusammenfügen kannst – hier sind deiner Fantasie keine Grenzen gesetzt. Wir zeigen dir, wie du einen NeoPixel Ring ganz einfach mithilfe deines Arduino ansteuern und den LEDs individuelle Farb- und Leuchtintensitätswerte zuweisen kannst. Signifikant ist hierbei der integrierte WS2812 Chip von Worldsemi.
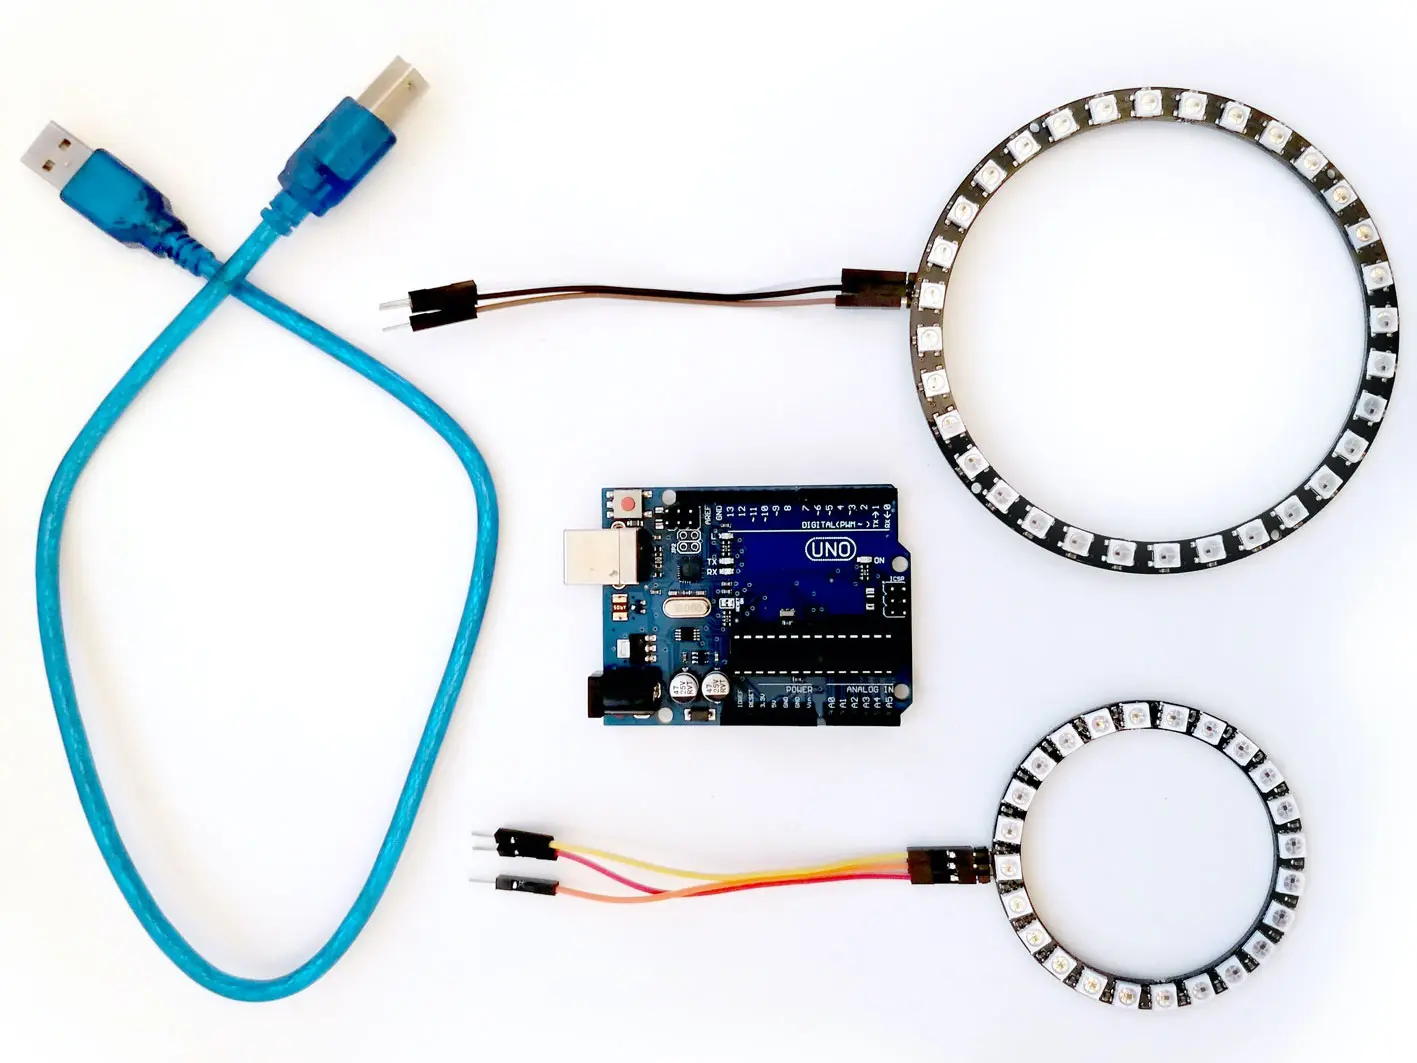
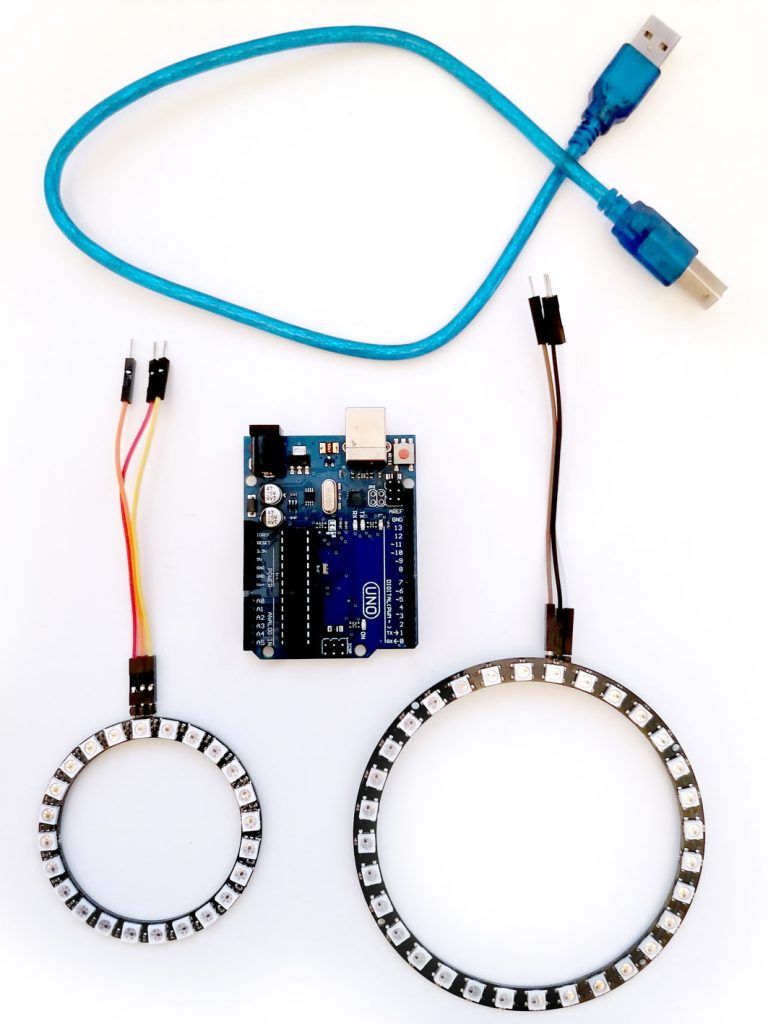
Diese Hardware benötigst du für das Projekt:
- Arduino Uno, Mega oder Nano
- NeoPixel Ring mit 24 WS2812 RGB LEDs
- NeoPixel Ring mit 32 WS2812 RGB LEDs
- Draht Jumper Kabel für Raspberry Pi und Arduino (Male – Female, 3 Stück)
Alle für dieses Projekt notwendigen Artikel landen mit einem Klick auf den Button direkt in deinem Warenkorb, sofern sie in unserem Shop verfügbar sind. Kontrolliere daher deinen Warenkorb genau!
Diese Software benötigst du für das Projekt:
- Arduino IDE: Das Open-Source-Tool erspart dir das aufwendige Implementieren des Protokolls, denn über die Bibliotheksverwaltung der Software kannst du die Library Adafruit NeoPixel schnell und kinderleicht installieren.
NeoPixel Ring mit Arduino ansteuern: Schritt für Schritt erklärt
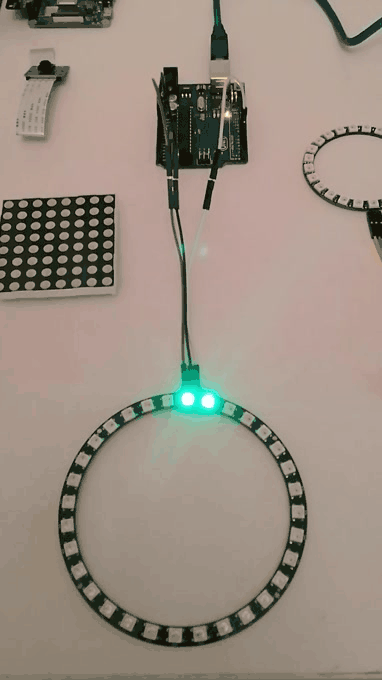
- Im ersten Schritt gilt es, die Schaltung zu bauen. Zu diesem Zweck haben wir nachfolgend die Pins des Arduino und des NeoPixel Rings aufgeführt, an denen du jeweils eine Verbindung herstellen musst.
Arduino Pins → NeoPixel Ring Pins
GND → GND
5v → 5v
D6 → IN

Bibliotheken einbinden:
- Als nächstes installierst du die Adafruit NeoPixel Bibliotheken. Hierbei gibt es zwei verschiedene Methoden:
Methode 1:
- Öffne in Arduino IDE die Option „Sketch“, navigiere dann zu „Bibliotheken einbinden“ und schließlich zu „Bibliotheken verwalten“. Gib anschließend in die Suchleiste „Neopixel strip“ ein, wähle die spezifische Version aus und installiere sie.

Methode 2:
- Öffne diese Website und lade die neuste Version von Adafruit NeoPixel herunter. Extrahiere die ZIP-Datei und öffne anschließend in Arduino IDE die Option „Sketch“. Wähle nun „Bibliotheken einbinden“ und danach „ZIP-Bibliothek hinzufügen“.
Der Code
- Bei diesem Projekt nutzen wir einen NeoPixel Ring mit 24 WS2812 LEDs. Du kannst das Vorhaben aber genauso gut mit anderen NeoPixel Modulen durchführen, die mit weniger LEDs bestückt sind. Du musst lediglich beachten, dass im jeweiligen Sketch die Gesamtanzahl der vorhandenen LEDs angegeben ist. Im Terminal sähe dies folgendermaßen aus: #define NUMPIXELS 24 – die Zahl 24 stünde in diesem Fall für die Anzahl der LEDs.
- Neben diesem Wert ist es vor allem wichtig, die Farbe der jeweiligen LEDs korrekt anzugeben. Hier lautet der entsprechende Sketch folgendermaßen:
pixels.setPixelColor(x,pixels.Color(0,255,0));In diesem Sketch sind gleich zwei Informationen enthalten: Zum einen würde „x“ die Nummer der LEDs angeben, die leuchten soll. Zum anderen beinhaltet der Part pixels.Color(0,255,0) Informationen bezüglich Farbe und Helligkeit der jeweiligen LED. Die Zahlen in der Klammer stehen jeweils für einen Farbwert: Die erste Zahl steht für „Rot“, die zweite für „Grün“ und die dritte für „Blau“. Es können Werte zwischen 0 und 255 eingesetzt werden. Beim Wert 0 bleibt die jeweilige Farbe komplett dunkel, beim Wert 255 leuchtet sie in der höchstmöglichen Stärke. Wenn du bei mehreren Farben Werte einträgst, ergibt sich folgerichtig eine Farbmischung.
Beispiele für Farben:
- pixels.setPixelColor(x,pixels.Color(255,0,0))=Rot
- pixels.setPixelColor(x,pixels.Color(0,255,0))=Grün
- pixels.setPixelColor(x,pixels.Color(0,0,255))=Blau
Nachfolgend findest du einen Beispielcode für einen NeoPixel Ring mit 24 LEDs:
Für die Variablen PIN, NUMPIXELS und DELAYVAL musst du noch werte eintragen.
#include <Adafruit_NeoPixel.h>
#ifdef __AVR__
 #include <avr/power.h>
#endif

// Which pin on the Arduino is connected to the NeoPixels?
#define PIN        6

// How many NeoPixels are attached to the Arduino?
#define NUMPIXELS 24


Adafruit_NeoPixel pixels(NUMPIXELS, PIN, NEO_GRB + NEO_KHZ800);

#define DELAYVAL 100 // Time (in milliseconds) to pause between pixels

void setup()

{

#if defined(__AVR_ATtiny85__) && (F_CPU == 16000000)
  clock_prescale_set(clock_div_1);
#endif


  pixels.begin(); // INITIALIZE NeoPixel strip object (REQUIRED)
}

void loop()

{
  pixels.clear(); // Set all pixel colors to 'off'

  // The first NeoPixel in a strand is #0, second is 1, all the way up
  // to the count of pixels minus one.
  for(int i=0; i<NUMPIXELS; i++)
  { // For each pixel...

    // pixels.Color() takes RGB values, from 0,0,0 up to 255,255,255
    // Here we're using a moderately bright blue color:
    //pixels.setPixelColor(i, pixels.Color(0, 150, 0));  //green
    //pixels.setPixelColor(i, pixels.Color(150, 0, 0));  //red
    pixels.setPixelColor(i, pixels.Color(0, 0, 150));  //blue

    pixels.show();   // Send the updated pixel colors to the hardware.

    delay(DELAYVAL); // Pause before next pass through loop
  }
}
Weitere Codebeispiele
Falls es dich interessiert, was mit dem Neopixelring noch möglich ist, haben wir hier noch ein paar weitere Codebeispiele für dich.
RGBW-Srandtest:

#include <Adafruit_NeoPixel.h>
#ifdef __AVR__
 #include <avr/power.h>
#endif

#define LED_PIN     6

// How many NeoPixels are attached to the Arduino?
#define LED_COUNT  24

// NeoPixel brightness, 0 (min) to 255 (max)
#define BRIGHTNESS 50

// Declare our NeoPixel strip object:
Adafruit_NeoPixel strip(LED_COUNT, LED_PIN, NEO_GRBW + NEO_KHZ800);
// Argument 1 = Number of pixels in NeoPixel strip
// Argument 2 = Arduino pin number (most are valid)
// Argument 3 = Pixel type flags, add together as needed:
//   NEO_KHZ800  800 KHz bitstream (most NeoPixel products w/WS2812 LEDs)
//   NEO_KHZ400  400 KHz (classic 'v1' (not v2) FLORA pixels, WS2811 drivers)
//   NEO_GRB     Pixels are wired for GRB bitstream (most NeoPixel products)
//   NEO_RGB     Pixels are wired for RGB bitstream (v1 FLORA pixels, not v2)
//   NEO_RGBW    Pixels are wired for RGBW bitstream (NeoPixel RGBW products)

void setup() {

#if defined(__AVR_ATtiny85__) && (F_CPU == 16000000)
  clock_prescale_set(clock_div_1);
#endif

  strip.begin();           // INITIALIZE NeoPixel strip object (REQUIRED)
  strip.show();            // Turn OFF all pixels ASAP
  strip.setBrightness(50); // Set BRIGHTNESS to about 1/5 (max = 255)
}

void loop() {
  // Fill along the length of the strip in various colors...
  colorWipe(strip.Color(255,   0,   0)     , 50); // Red
  colorWipe(strip.Color(  0, 255,   0)     , 50); // Green
  colorWipe(strip.Color(  0,   0, 255)     , 50); // Blue
  colorWipe(strip.Color(  0,   0,   0, 255), 50); // True white (not RGB white)

  whiteOverRainbow(75, 5);

  pulseWhite(5);

  rainbowFade2White(3, 3, 1);
}

// Fill strip pixels one after another with a color. Strip is NOT cleared
// first; anything there will be covered pixel by pixel. Pass in color
// (as a single 'packed' 32-bit value, which you can get by calling
// strip.Color(red, green, blue) as shown in the loop() function above),
// and a delay time (in milliseconds) between pixels.
void colorWipe(uint32_t color, int wait) {
  for(int i=0; i<strip.numPixels(); i++) { // For each pixel in strip...
    strip.setPixelColor(i, color);         //  Set pixel's color (in RAM)
    strip.show();                          //  Update strip to match
    delay(wait);                           //  Pause for a moment
  }
}

void whiteOverRainbow(int whiteSpeed, int whiteLength) {

  if(whiteLength >= strip.numPixels()) whiteLength = strip.numPixels() - 1;

  int      head          = whiteLength - 1;
  int      tail          = 0;
  int      loops         = 3;
  int      loopNum       = 0;
  uint32_t lastTime      = millis();
  uint32_t firstPixelHue = 0;

  for(;;) { // Repeat forever (or until a 'break' or 'return')
    for(int i=0; i<strip.numPixels(); i++) {  // For each pixel in strip...
      if(((i >= tail) && (i <= head)) ||      //  If between head & tail...
         ((tail > head) && ((i >= tail) || (i <= head)))) {
        strip.setPixelColor(i, strip.Color(0, 0, 0, 255)); // Set white
      } else {                                             // else set rainbow
        int pixelHue = firstPixelHue + (i * 65536L / strip.numPixels());
        strip.setPixelColor(i, strip.gamma32(strip.ColorHSV(pixelHue)));
      }
    }

    strip.show(); // Update strip with new contents
    // There's no delay here, it just runs full-tilt until the timer and
    // counter combination below runs out.

    firstPixelHue += 40; // Advance just a little along the color wheel

    if((millis() - lastTime) > whiteSpeed) { // Time to update head/tail?
      if(++head >= strip.numPixels()) {      // Advance head, wrap around
        head = 0;
        if(++loopNum >= loops) return;
      }
      if(++tail >= strip.numPixels()) {      // Advance tail, wrap around
        tail = 0;
      }
      lastTime = millis();                   // Save time of last movement
    }
  }
}

void pulseWhite(uint8_t wait) {
  for(int j=0; j<256; j++) { // Ramp up from 0 to 255
    // Fill entire strip with white at gamma-corrected brightness level 'j':
    strip.fill(strip.Color(0, 0, 0, strip.gamma8(j)));
    strip.show();
    delay(wait);
  }

  for(int j=255; j>=0; j--) { // Ramp down from 255 to 0
    strip.fill(strip.Color(0, 0, 0, strip.gamma8(j)));
    strip.show();
    delay(wait);
  }
}

void rainbowFade2White(int wait, int rainbowLoops, int whiteLoops) {
  int fadeVal=0, fadeMax=100;

  // Hue of first pixel runs 'rainbowLoops' complete loops through the color
  // wheel. Color wheel has a range of 65536 but it's OK if we roll over, so
  // just count from 0 to rainbowLoops*65536, using steps of 256 so we
  // advance around the wheel at a decent clip.
  for(uint32_t firstPixelHue = 0; firstPixelHue < rainbowLoops*65536;
    firstPixelHue += 256) {

    for(int i=0; i<strip.numPixels(); i++) { // For each pixel in strip...

      // Offset pixel hue by an amount to make one full revolution of the
      // color wheel (range of 65536) along the length of the strip
      // (strip.numPixels() steps):
      uint32_t pixelHue = firstPixelHue + (i * 65536L / strip.numPixels());

      // strip.ColorHSV() can take 1 or 3 arguments: a hue (0 to 65535) or
      // optionally add saturation and value (brightness) (each 0 to 255).
      // Here we're using just the three-argument variant, though the
      // second value (saturation) is a constant 255.
      strip.setPixelColor(i, strip.gamma32(strip.ColorHSV(pixelHue, 255,
        255 * fadeVal / fadeMax)));
    }

    strip.show();
    delay(wait);

    if(firstPixelHue < 65536) {                              // First loop,
      if(fadeVal < fadeMax) fadeVal++;                       // fade in
    } else if(firstPixelHue >= ((rainbowLoops-1) * 65536)) { // Last loop,
      if(fadeVal > 0) fadeVal--;                             // fade out
    } else {
      fadeVal = fadeMax; // Interim loop, make sure fade is at max
    }
  }

  for(int k=0; k<whiteLoops; k++) {
    for(int j=0; j<256; j++) { // Ramp up 0 to 255
      // Fill entire strip with white at gamma-corrected brightness level 'j':
      strip.fill(strip.Color(0, 0, 0, strip.gamma8(j)));
      strip.show();
    }
    delay(1000); // Pause 1 second
    for(int j=255; j>=0; j--) { // Ramp down 255 to 0
      strip.fill(strip.Color(0, 0, 0, strip.gamma8(j)));
      strip.show();
    }
  }

  delay(500); // Pause 1/2 second
}
Sample24:

#include <Adafruit_NeoPixel.h>
#ifdef __AVR__
 #include <avr/power.h>
#endif

// Which pin on the Arduino is connected to the NeoPixels?
#define PIN        6

// How many NeoPixels are attached to the Arduino?
#define NUMPIXELS 24


Adafruit_NeoPixel pixels(NUMPIXELS, PIN, NEO_GRB + NEO_KHZ800);

#define DELAYVAL 100 // Time (in milliseconds) to pause between pixels

void setup()

{

#if defined(__AVR_ATtiny85__) && (F_CPU == 16000000)
  clock_prescale_set(clock_div_1);
#endif


  pixels.begin(); // INITIALIZE NeoPixel strip object (REQUIRED)
}

void loop()

{
  pixels.clear(); // Set all pixel colors to 'off'

  // The first NeoPixel in a strand is #0, second is 1, all the way up
  // to the count of pixels minus one.
  for(int i=0; i<NUMPIXELS; i++)
  { // For each pixel...

    // pixels.Color() takes RGB values, from 0,0,0 up to 255,255,255
    // Here we're using a moderately bright blue color:
    //pixels.setPixelColor(i, pixels.Color(0, 150, 0));  //green
    //pixels.setPixelColor(i, pixels.Color(150, 0, 0));  //red
    pixels.setPixelColor(i, pixels.Color(0, 0, 150));  //blue

    pixels.show();   // Send the updated pixel colors to the hardware.

    delay(DELAYVAL); // Pause before next pass through loop
  }
}
Sample 32:
#include <Adafruit_NeoPixel.h>
#ifdef __AVR__
 #include <avr/power.h>
#endif

// Which pin on the Arduino is connected to the NeoPixels?
#define PIN        6

// How many NeoPixels are attached to the Arduino?
#define NUMPIXELS 32


Adafruit_NeoPixel pixels(NUMPIXELS, PIN, NEO_GRB + NEO_KHZ800);

#define DELAYVAL 500 // Time (in milliseconds) to pause between pixels

void setup()

{

#if defined(__AVR_ATtiny85__) && (F_CPU == 16000000)
  clock_prescale_set(clock_div_1);
#endif


  pixels.begin(); // INITIALIZE NeoPixel strip object (REQUIRED)
}

void loop()

{
  pixels.clear(); // Set all pixel colors to 'off'

  // The first NeoPixel in a strand is #0, second is 1, all the way up
  // to the count of pixels minus one.
  for(int i=0; i<NUMPIXELS; i++)
  { // For each pixel...

    // pixels.Color() takes RGB values, from 0,0,0 up to 255,255,255
    // Here we're using a moderately bright green color:
    pixels.setPixelColor(i, pixels.Color(0, 150, 0));  //green
    //pixels.setPixelColor(i, pixels.Color(150, 0, 0));  //red
    //pixels.setPixelColor(i, pixels.Color(0, 0, 150));  //blue

    pixels.show();   // Send the updated pixel colors to the hardware.

    delay(DELAYVAL); // Pause before next pass through loop
  }
}
Strandtest:

#include <Adafruit_NeoPixel.h>
#ifdef __AVR__
 #include <avr/power.h>
#endif

#define LED_PIN    6

// How many NeoPixels are attached to the Arduino?
#define LED_COUNT 32

// Declare our NeoPixel strip object:
Adafruit_NeoPixel strip(LED_COUNT, LED_PIN, NEO_GRB + NEO_KHZ800);
// Argument 1 = Number of pixels in NeoPixel strip
// Argument 2 = Arduino pin number (most are valid)
// Argument 3 = Pixel type flags, add together as needed:
//   NEO_KHZ800  800 KHz bitstream (most NeoPixel products w/WS2812 LEDs)
//   NEO_KHZ400  400 KHz (classic 'v1' (not v2) FLORA pixels, WS2811 drivers)
//   NEO_GRB     Pixels are wired for GRB bitstream (most NeoPixel products)
//   NEO_RGB     Pixels are wired for RGB bitstream (v1 FLORA pixels, not v2)
//   NEO_RGBW    Pixels are wired for RGBW bitstream (NeoPixel RGBW products)


// setup() function -- runs once at startup --------------------------------

void setup() {

#if defined(__AVR_ATtiny85__) && (F_CPU == 16000000)
  clock_prescale_set(clock_div_1);
#endif


  strip.begin();           // INITIALIZE NeoPixel strip object (REQUIRED)
  strip.show();            // Turn OFF all pixels ASAP
  strip.setBrightness(50); // Set BRIGHTNESS to about 1/5 (max = 255)
}


// loop() function -- runs repeatedly as long as board is on ---------------

void loop() {
  // Fill along the length of the strip in various colors...
  colorWipe(strip.Color(255,   0,   0), 50); // Red
  colorWipe(strip.Color(  0, 255,   0), 50); // Green
  colorWipe(strip.Color(  0,   0, 255), 50); // Blue

  // Do a theater marquee effect in various colors...
  theaterChase(strip.Color(127, 127, 127), 50); // White, half brightness
  theaterChase(strip.Color(127,   0,   0), 50); // Red, half brightness
  theaterChase(strip.Color(  0,   0, 127), 50); // Blue, half brightness

  rainbow(10);             // Flowing rainbow cycle along the whole strip
  theaterChaseRainbow(50); // Rainbow-enhanced theaterChase variant
}


// Some functions of our own for creating animated effects -----------------

// Fill strip pixels one after another with a color. Strip is NOT cleared
// first; anything there will be covered pixel by pixel. Pass in color
// (as a single 'packed' 32-bit value, which you can get by calling
// strip.Color(red, green, blue) as shown in the loop() function above),
// and a delay time (in milliseconds) between pixels.
void colorWipe(uint32_t color, int wait) {
  for(int i=0; i<strip.numPixels(); i++) { // For each pixel in strip...
    strip.setPixelColor(i, color);         //  Set pixel's color (in RAM)
    strip.show();                          //  Update strip to match
    delay(wait);                           //  Pause for a moment
  }
}

// Theater-marquee-style chasing lights. Pass in a color (32-bit value,
// a la strip.Color(r,g,b) as mentioned above), and a delay time (in ms)
// between frames.
void theaterChase(uint32_t color, int wait) {
  for(int a=0; a<10; a++) {  // Repeat 10 times...
    for(int b=0; b<3; b++) { //  'b' counts from 0 to 2...
      strip.clear();         //   Set all pixels in RAM to 0 (off)
      // 'c' counts up from 'b' to end of strip in steps of 3...
      for(int c=b; c<strip.numPixels(); c += 3) {
        strip.setPixelColor(c, color); // Set pixel 'c' to value 'color'
      }
      strip.show(); // Update strip with new contents
      delay(wait);  // Pause for a moment
    }
  }
}

// Rainbow cycle along whole strip. Pass delay time (in ms) between frames.
void rainbow(int wait) {
  // Hue of first pixel runs 5 complete loops through the color wheel.
  // Color wheel has a range of 65536 but it's OK if we roll over, so
  // just count from 0 to 5*65536. Adding 256 to firstPixelHue each time
  // means we'll make 5*65536/256 = 1280 passes through this outer loop:
  for(long firstPixelHue = 0; firstPixelHue < 5*65536; firstPixelHue += 256) {
    for(int i=0; i<strip.numPixels(); i++) { // For each pixel in strip...
      // Offset pixel hue by an amount to make one full revolution of the
      // color wheel (range of 65536) along the length of the strip
      // (strip.numPixels() steps):
      int pixelHue = firstPixelHue + (i * 65536L / strip.numPixels());
      // strip.ColorHSV() can take 1 or 3 arguments: a hue (0 to 65535) or
      // optionally add saturation and value (brightness) (each 0 to 255).
      // Here we're using just the single-argument hue variant. The result
      // is passed through strip.gamma32() to provide 'truer' colors
      // before assigning to each pixel:
      strip.setPixelColor(i, strip.gamma32(strip.ColorHSV(pixelHue)));
    }
    strip.show(); // Update strip with new contents
    delay(wait);  // Pause for a moment
  }
}

// Rainbow-enhanced theater marquee. Pass delay time (in ms) between frames.
void theaterChaseRainbow(int wait) {
  int firstPixelHue = 0;     // First pixel starts at red (hue 0)
  for(int a=0; a<30; a++) {  // Repeat 30 times...
    for(int b=0; b<3; b++) { //  'b' counts from 0 to 2...
      strip.clear();         //   Set all pixels in RAM to 0 (off)
      // 'c' counts up from 'b' to end of strip in increments of 3...
      for(int c=b; c<strip.numPixels(); c += 3) {
        // hue of pixel 'c' is offset by an amount to make one full
        // revolution of the color wheel (range 65536) along the length
        // of the strip (strip.numPixels() steps):
        int      hue   = firstPixelHue + c * 65536L / strip.numPixels();
        uint32_t color = strip.gamma32(strip.ColorHSV(hue)); // hue -> RGB
        strip.setPixelColor(c, color); // Set pixel 'c' to value 'color'
      }
      strip.show();                // Update strip with new contents
      delay(wait);                 // Pause for a moment
      firstPixelHue += 65536 / 90; // One cycle of color wheel over 90 frames
    }
  }
}
Viel Spaß mit dem NeoPixel-Ring
Wir wünschen dir viel Spaß mit dem NeoPixel-Ring und hoffen, dass du mit Hilfe dieses Tutorials viele Coole Projekte bauen kannst. Falls du Fragen zu diesem Projekt hast, kannst du sie gerne in die Kommentare schreiben! Alle benötigten Teile findest du noch einmal hier!
Dein BerryBase-Team!


Cooles Tutorial! Hat mir sehr geholfen. ????
Hallo
Könnten Sie bitte ein Tutorial zu mehren Rgb Ringen in einem Arduino-Schaltkreis hochladen. Diese sollten wenn möglich Hilfe eines Ultraschallsensoren aktiviert werden. Ich wäre sehr dankbar über eine schnelle Antwort.
Vielen Dank
Viele Grüße
Leon Biedermann
Sehr schönes Tutorial, aber ja, ich hätte da noch eine Frage und zwar:
Wie könnte ich einen Ring über Android (->Bluetooth) ansteuern und dies einerseits mit z.B. auf Android r senden und ann sind alle Pixel Rot.
Oder aber auf Android auch Befehle senden zu könnne. welche rainbow oder durchlauf Funktionen zur Folge haben.
Wäre also super, wenn es ein Zusatztutorial in dieser Art geben würde.
Wie kann man dir Lauf Richtung ändern, von links nach rechts, oder umgekehrt
l
Echt cool ich habe mir die LEDs gekauft und wusste nich wie es geht und jetzt geht es Danke!
PS: Ich nutze einen Arduino Mega